 Merken
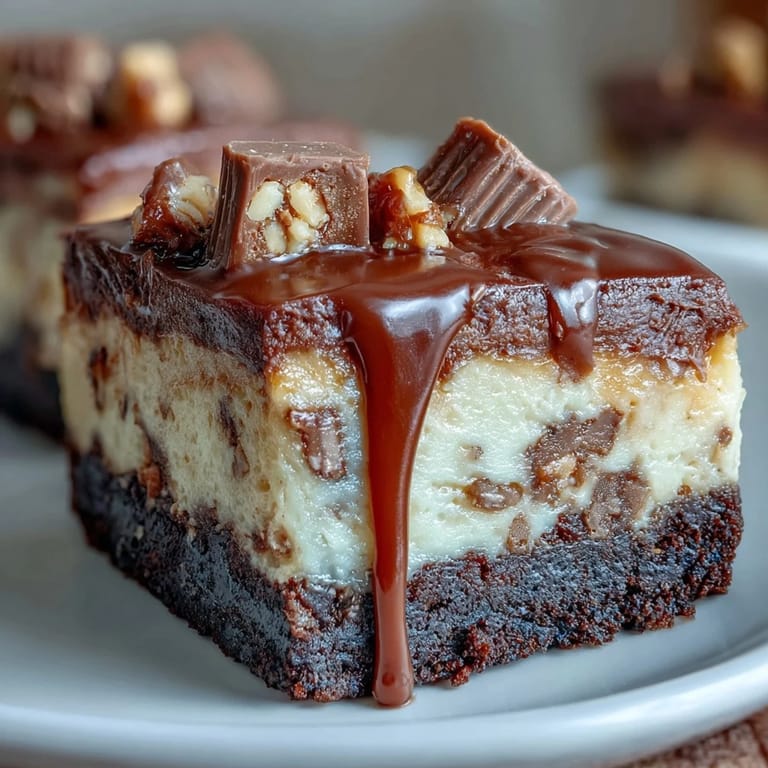
 My neighbor Sarah showed up one Tuesday evening with a container of these peanut butter cup cheesecake bars, and I understood immediately why she'd been so secretive about the recipe. One bite and I was completely undone—the way that creamy peanut butter filling played against the chocolate cookie crust felt like someone had finally figured out what my dessert dreams actually wanted. I started making them that weekend, and now they're the first thing I reach for when I need to impress people or just need an excuse to fill my kitchen with that toasted peanut butter smell.
I brought these to my book club last month, and the conversation literally stopped. Everyone got quiet, the way people do when something tastes unexpectedly good, and then someone asked me to never bring anything else ever again because it would only disappoint. That's when I knew these weren't just another dessert—they were the kind of thing that changes how people think about what's possible in a 9x9 pan.
Ingredients
- Chocolate cookie crumbs (1 1/2 cups): Use Oreos with the cream scraped out, or any chocolate sandwich cookie—they're the foundation that keeps everything grounded and gives you that slight bitterness against all the sweetness.
- Unsalted butter (1/4 cup, melted): This binds everything together, so don't skip it or use coconut oil unless you want a crumbly crust that falls apart.
- Granulated sugar for crust (2 tbsp): Just a whisper of extra sweetness to balance the cookie's intensity.
- Cream cheese (16 oz, softened): Room temperature is non-negotiable—cold cream cheese leaves lumps that no amount of beating will fix, and I've learned this lesson more than once.
- Granulated sugar for filling (2/3 cup): This is what makes the filling silky and prevents graininess, so measure carefully.
- Large eggs (2, room temperature): Cold eggs seize up the filling, so pull them out of the fridge about 30 minutes before baking.
- Sour cream (1/2 cup): This adds tang and keeps the bars from being aggressively sweet while creating that dense cheesecake texture.
- Creamy peanut butter (1/2 cup): The star ingredient—use a good quality one where you can taste the actual peanuts, not the sugar-laden kind.
- Vanilla extract (1 tsp): Just enough to round out all the flavors without announcing itself.
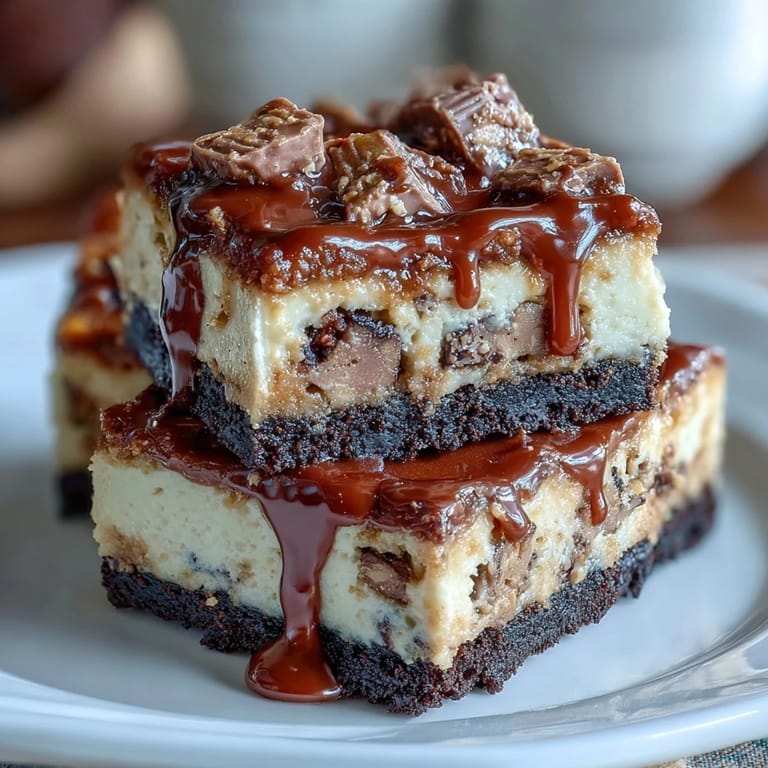
- Mini peanut butter cups (1 1/2 cups, chopped): These are what make people pause and ask what's in here—fold half into the filling so you get them throughout, not just on top.
- Semisweet chocolate chips (1/2 cup, optional): A final garnish that catches the light and makes these look like you spent hours on them.
- Creamy peanut butter for drizzle (2 tbsp, melted): Warm it gently so it flows like liquid gold across the top.
Tired of Takeout? 🥡
Get 10 meals you can make faster than delivery arrives. Seriously.
One email. No spam. Unsubscribe anytime.
Instructions
- Prep your pan like you mean it:
- Line a 9x9-inch baking pan with parchment paper and let it overhang on two sides—this is how you get these bars out without breaking them into sad little chunks. Preheat your oven to 350°F so it's ready when you need it.
- Build a crust that won't quit:
- Combine crushed chocolate cookies, melted butter, and sugar in a medium bowl until it looks like wet sand. Press it firmly and evenly into the bottom of your pan with the bottom of a measuring cup, then bake for 8 minutes—this partial bake sets it so the filling won't make it soggy.
- Get the cream cheese silky:
- In a large bowl with an electric mixer, beat softened cream cheese and sugar together for about 3 minutes until it goes from lumpy to completely smooth and creamy. Scrape down the sides halfway through because corners hide lumps.
- Add the eggs carefully:
- Add one egg at a time, beating just until combined after each one—overmixing here introduces air bubbles that cause cracks. Mix in sour cream, peanut butter, and vanilla until the filling is uniform and luxurious-looking.
- Fold in the treasure:
- Gently fold in 1 cup of the chopped mini peanut butter cups so they're distributed throughout the filling without crushing them into dust. Reserve the other half cup for the top.
- Layer and top:
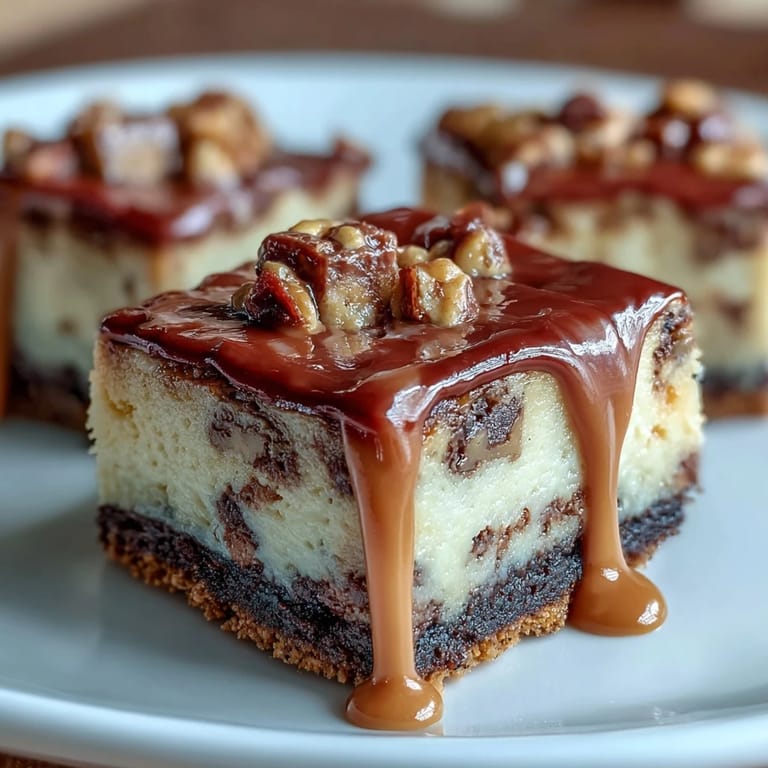
- Pour the cheesecake filling over that cooled crust and spread it evenly. Scatter the remaining chopped peanut butter cups across the top so every slice gets a reward.
- Bake until just set:
- Bake for 25 to 28 minutes—you want the center to be just barely jiggly when you gently shake the pan, like it's unsure but still intact. Overbaking makes it dense and cracked, underbaking makes it soup.
- Cool with patience:
- Let these cool completely at room temperature for about an hour, then refrigerate for at least 2 hours until they're firm enough to slice cleanly. This isn't wasted time—it's when the flavors settle and become friends with each other.
- Finish and serve:
- Before serving, drizzle melted peanut butter across the top in whatever pattern makes you happy, add chocolate chip garnish if you're feeling fancy, then slice into 16 bars with a sharp knife dipped in hot water and wiped clean between cuts.
 Merken
 My eight-year-old nephew asked me last weekend if cheesecake bars could be my superpower, and honestly, he might be onto something. There's something about putting these in front of people that makes moments feel a little more special, a little more intentional.
The Science of a Perfect Crust
I spent way too long figuring out why my crusts were either too soft or too crumbly before I realized the crust needs that initial 8-minute bake to set before the wet filling hits it. The butter seals the crumbs just enough that they stay crispy instead of turning into a soggy sponge that tastes sad. This small step is honestly the difference between biting into something with structure and getting filling that falls straight through to your plate.
Chocolate and Peanut Butter Chemistry
There's actual science to why chocolate and peanut butter taste so good together—they have complementary flavor compounds that make each other more interesting, but here's what I've learned in practice: the balance matters. If your filling is too peanut butter-forward, the chocolate cookies at the bottom get lost, but if you don't have enough peanut butter presence, it becomes just another cheesecake with some candies sprinkled on top. I've learned to taste my filling as I'm mixing and trust my gut about whether it needs another tablespoon of peanut butter or not.
Storage and Serving Wisdom
These bars actually improve after a day in the fridge when all the flavors have merged into something bigger than their parts. They keep beautifully for up to 5 days in an airtight container, though honestly I've never had a batch last that long. Slice them when they're cold so you get clean cuts, and pull them out about 15 minutes before serving if you want the peanut butter filling to have that perfect soft texture.
- Store in an airtight container in the coldest part of your fridge, away from anything with a strong smell.
- These freeze beautifully for up to 3 months if you wrap them individually in plastic wrap first.
- Cold milk or a light coffee is the perfect accompaniment, though honestly they're good on their own.
 Merken
 These bars have become my secret weapon for turning an ordinary day into something worth celebrating. Make them, share them, and watch what happens when people taste something made with this much care.
Rezept-Fragen
- → Welche Schokoladenkekse eignen sich am besten für den Boden?
Am besten eignen sich zerkrümelte Schokoladenkekse ohne Cremefüllung wie klassische Oreos, da sie für eine feste, aromatische Basis sorgen.
- → Kann ich Erdnussbutter durch eine andere Nussbutter ersetzen?
Ja, Mandel- oder Cashewbutter sind gute Alternativen, achten Sie jedoch auf den Geschmack und mögliche Allergien.
- → Wie lange sollte man die Käsekuchenriegel kühlen?
Mindestens zwei Stunden im Kühlschrank, damit sie vollständig fest werden und sich gut schneiden lassen.
- → Wie erreiche ich eine besonders cremige Füllung?
Verwenden Sie weich gewordenen Frischkäse und rühren Sie die Zutaten sorgfältig glatt, ohne zu viel Luft hinein zu schlagen.
- → Kann man die Riegel im Voraus zubereiten?
Ja, sie lassen sich wunderbar vorbereiten und im Kühlschrank bis zu fünf Tage aufbewahren.